Tekka – a miso condiment

Once a year I clean out my fridge of old jars of miso paste. I gather up the remnants from a variety of containers, scrap off any mold, and add this to a combination of ground root vegetables. After cooking for several hours, the end result is a wonderful savory condiment, Tekka.

Tekka- miso condiment.

Tekka- miso condiment.


Finding a recipe online is an easy task, and most that come up on a web search are nearly identical in ingredients and method. I use burdock and lotus roots, carrot, ginger and sesame seeds. These are ground fine, sautéd in sesame oil, then the miso is added and the mixture is cooked and stirred all day on very, very low heat.

Tekka on delicata squash.

Tekka on delicata squash.


The end result is a rich tasting, deep brown granular sprinkle, and great on eggs, salads, mashed potatoes, and much more.


Tekka on fried eggs.

Tekka on fried eggs.

Raw Black-eyed Pea Miso Paste

raw miso harvest

This miso paste ferment is an experiment using all raw ingredients.

2# 6oz. raw black-eyed peas (soaked and chopped)

2# 8oz. raw barley koji

7.2 oz. salt

Lima bean miso starter (blended in water and strained)


First the koji.  I soaked pearled barley over night, and it puffs up all swollen and soft.  I sifted spores from a previous batch of barley koji into a hotel pan, and tossed the raw soaked barley around in the spores coating them thoroughly.  Then I incubated them at 85° F for 48 hours. (There are many already-published incubation methods for koji, and I won’t go into them here.)


Next the Black-eyed peas (BEP).  I soaked them for 24 hours.  They swell up big, too, and get fairly soft compared to many beans.  I pulsed them slightly with the S-blade in a Cuisinart™ until they were chopped medium.

I put 2 tablespoons of live lima bean miso (not raw) into a cup of water and blended thoroughly.  I let it sit for 20 minutes as the solids (cooked) settled to the bottom of the cup, and then poured off the liquid, which was full of bacteria from its own lacto-ferment.

I then blended the raw barley koji with the starter water, added half the salt, and then mixed this into the chopped BEP.  I packed it into a crock and put a plate and weight on top.  That was 14 months ago. ( I never added more than half the salt as it was salty enough without it to my taste preference.)

blended raw misoHere’s the BEP paste blended in the crock with an immersion blender. (Blending brings out lots of flavor.)

This fermented miso paste tastes much brighter than other BEP miso pastes I’ve made.  It is less complex on the palette, and the flavor of the BEP comes through very strong.  It is very delicious as a broth, and I have not yet experimented with it in any other dishes.


On making a cup of miso broth.


heat the cup

Boil good water. Fill a beautiful cup or mug with the boiling water to heat the vessel.  Once hot, pour the water back into the kettle.  (This cools the water in the kettle.)


Add miso paste and a little cold water, and stir to mix well.add the paste

stir in cold water


Add hot water to bring temperature up to suite your palette, without killing the miso.top w hot water


Cobbler time – Sweet Garbanzo Miso

This miso paste is young, only 2 months, and is so delicious in a very different kind of way.  It is sweet and mild, full and very satisfying on the palette.  This is how I made this batch:

A spoonful of miso.

A spoonful of miso.

8# cooked garbanzo beans

7 # 6oz rice koji

4% sea salt (10 oz)

Garbanzo bean miso starter miso

(This filled 2 1-gallon crocks)


The tamairi is incredible but scant.  Sweet almost like honey, not too salty and so luxurious.

tamari


One of my favorite uses for sweet miso is pies and cobbler.  My daughter and I went u-picking blueberries yesterday.  Then I foraged in my garden for the ripest blackberries, and added three ripe apricots from the farmers market.

mixing the fruit


Other ingredients include:

Tapioca

Cardamom

Vanilla extract

And, of course, sweet garbanzo miso paste, which is the source of salt and a lot of yumminess (umami).

(Stir together and pour into a baking dish.)


The crust is simply almond meal, vanilla, safflower oil, and some sweet garbanzo miso.

crust


(Mix together and crumble on top of the fruit.)


Bake @ 350 °F until fruit is bubbly and the crust is browned.

cobbler time


Naturally it’s gonna go well with some ice cream.


Snuggled Eggs, or Miso-fermented Egg Yolk

The end result of this ferment is a creamy, rich and delicious ball of goodness.  And with a texture and flavor much more reminiscent of a soft stinky cheese than of egg yolk.  I first read of this process in The Book of Miso, by William Shurtleff & Akiko Aoyagi.


It’s fairly straight forward: bury egg yolks in miso, wait, recover yolk, and enjoy.


I ferment a dozen or two at a time, and my method was inspired by the playing with fire & water food blog [http://www.playingwithfireandwater.com/foodplay/].


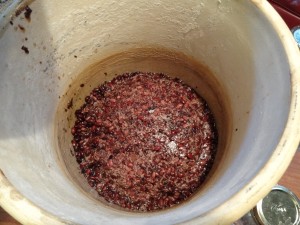
Materials: fermenting vessel, miso paste, soft boiled or raw egg yolks, and cheese cloth.  These are layered in a crock in a sandwich-like fashion. I start with a 1-2” layer of miso, and then place a single layer of cheese cloth on top.  I use a handle of a wooden spoon (it has a very bulbous end) and push divots into the miso the size of the yolks, pressing the cheese cloth into the miso as I go.  Next, I carefully set the yolks into the divots, and cover with another layer of cheese cloth. I then cover it all with another layer of miso paste. I repeat this process until I run out of yolks, or room in the crock.

An important detail is to keep the corners of the cheese cloth visible on top of the layer of what is on top of it , so that you can lift out what is on top of it, either a layer of miso, or of yolks, easily and cleanly. The whole purpose of the cheese cloth is to be able to recover the yolks as whole discrete balls, and not as mushy smashed blobs full of miso bits. And it works really slick, too.  Here are some photographs.


Putting divots into the miso on top of a layer of cheese cloth.


Adding a raw yolk.


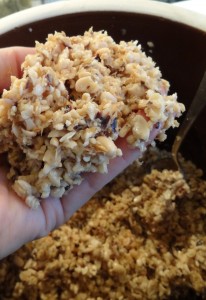
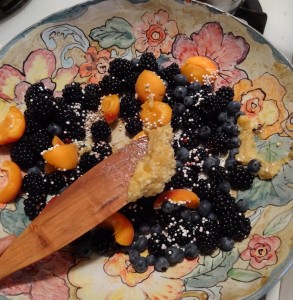
Five soft boiled yolks wrapped in cheese cloth and ready to be covered in miso. I’ve pulled in the corners of the cheese cloth so they will be revealed after I remove the layer of miso that will sit on top of them.


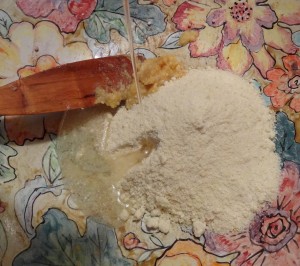
Adding a top layer of cheese cloth and miso.


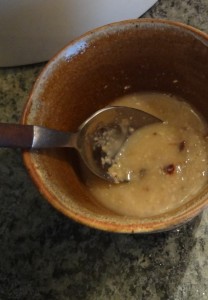
These yolks are ready to harvest.  I’ve removed the top layer of miso (bowl on left) and exposed the  yolks beneath.


Here is the layer of yolks removed inside their own cheese cloth, and a solo yolk about to be tied for drying.


These yolks have been tied in cheese cloth and draped over a beer bottle. They’ll stand in the fridge for a couple weeks and dry out to a crumbly or even a grate-able texture.


These yolks went into the smoker still inside their cheese cloth.  They are amazingly delicious!


My first batch of yolks I let ferment 6 months.  One week seemed way too short to me.  Having done both, the one-week yolks achieve a very sour taste, but lack the complex flavors of the miso from a longer ferment.  Both are very good. When I ferment a dozen or more, I use a crock and pack the top with a plate and weight, just as though I were making miso.  I’ve made one-week yolks only in a small jar, and it sits on the counter in the kitchen until ready.  I think either could go in the fridge for the ferment, though it might take longer.  Which ever method you use, remember to leave head space in the top of the vessel for some CO2 expansion, and liquid/tamari collection.

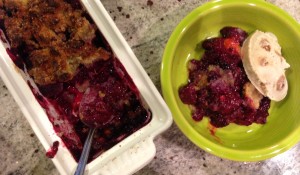
My favorite way to enjoy the yolks is as a spread on good bread or crackers.  They are also great blended in salad dressing, spread on top of poached eggs (with a little tekka miso sprinkled over), or tossed with fresh noodles or pasta.  They are also a fun food for a potluck, as they seem to push the limits of the culinary frontier, and the flavor of this ferment nearly always wins over a hesitant doubter.


Black bean Miso with Smoked Salt

Ingredients:

5 lbs. rice koji (10 cups volume of uncooked rice)

10 lbs. cooked black beans (5# dry weight)

Salt (8%  by weight), plus 5 T. smoked salt

Hijiki seaweed  (2 oz.)

Garlic; fresh crushed (2 heads)

Red pepper flakes (handful)

I started this batch of miso in May 2011.  I harvested the tamari after 6 weeks, and replenished with salt brine.  This miso formed no mold during its ferment, and I harvested tamari again when I harvested the miso last week.  The second harvest of tamari tasted just as good as the first, which, for some reason, surprised me.

Under the plate.

This batch of miso was also very wet, and it might be because I did not smash the beans well in the beginning. As you can see from the pics, the beans and koji are still intact (and the beans very tasty to eat whole).  I used about half the miso to ferment duck and chicken egg yolks.  They’ll be ready in about 6 months.  I then used an immersible blender to homogenize some of the miso into a thick uniform paste.

Black Bean tamari harvest.