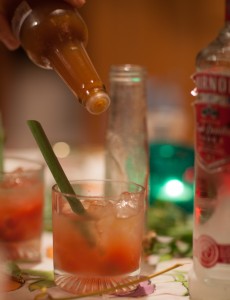
Fermented Bloody Mary Cocktail

Ingredients:

Fermented tomato juice (tomato juice and smoked salt; 12 months old)

Vodka

Salt and Pepper

Hot pepper sauce (fermented 2 yrs)

Worcestershire sauce, (fermented by Lea & Perrins®)

Loveage stem (straws)

Ice

Fermenting vegetable juices is extremely easy, and the results are exceedingly delicious.  Last summer I started with two cases of organic roma tomatoes.  I sliced them in half, sprinkled on some smoked salt, and let it ferment in a crock for a week.  After 2 days, the tomatoes were reduced to a thick slurry. After a week, the pulp was removed from the seeds and skin.  I stirred 2 or 3 times every day to reduce mold establishment.  After a week I strained the seeds and pulp out, and filled narrow sauce bottles with the juice.  I added a tablespoon of olive oil on top of the contents of each jar to prevent oxygen from contacting the juice.  Then waited a year.  Fantastic flavor!

Last week we finally got our typical week or two of hot daytime temperatures and warm evenings here in Seattle.  Perfect weather for cocktails in the garden.  Drinking the cocktails from Loveage stems for straws was an added flavor, especially if the stem was chewed slightly.  They were so delicious, we had to open another bottle of tomato juice and keep going.

Addiing a finishing splash.

If you’re up for fermenting your own cocktail mixers, this is the best resource in know: Preserving Food Without Freezing or Canning by The Gardeners & Farmers of Terre Vivante, published in 1999 by Chelsea Green.

I’ve fermented carrot, beet, celery, radish, cucumber, tomato, and various blends of green vegetable juices, all with rewarding success.  Add a little salt and let time do its magic.  I remove the olive oil from the narrow neck of the jar with a turkey baster.  I’ve also used airlocks with success, or just let the top mold and pull the ‘plug’ out when it’s time to use the juice.  The pulp and pigments typically settle to the bottom of the jar, leaving clear liquid.  Stir or shake as desired.  These juices are also great in soup, or to deglaze a pan when sautéing.  (Photographs by Kwai Lam.)

Bloody Mary time.


What’s older than its Mother?

My grandma told me that riddle while we were pressing apples in the orchard when i was 13. We had just filled a 50 gallon wooden barrel with the cider we pressed, and covered it in place in the root cellar to let it ferment. We wanted the vinegar.  It never occurred to me that the riddle might have more than one answer.

After fermenting water kefir for several months, I noticed a faint translucent mother had arrived on the surface of the finished ferment.  It looked just like the young mother on vinegar or kombucha: thin and gelatinous.  I fished it out with a scowl and discarded it after 4 or 5 harvests. The next time I went to harvest the kefir, there she was again. This time I saved her in a separate jar. As i replenished the sugar water over the kefir grains, I withheld a little of the solution for the young mother, covered both jars over and put them on the shelf to ferment. Ten days later, both had new mothers floating on top: small and thin (compared to kombucha or vinegar) but very much present.

For the past year and a half, I’ve repeated this process when i harvest the original elixer: skim off the mother from the jar with the kefir grains, and add it to the jar now full of mothers. I now treat both jars (1-gallon size) the same, and I can’t tell any difference in the resulting beverage. I feed each batch one-half Meyer lemon and one-half dried fig each time I make a new batch. This flavor combination is really over the top.

The jar with the kefir grains continues to form only a thin mother each time, where the jar full of mothers now forms a thick white mat, not  unlike white wine vinegar mother.


Michel Blazy’s Kombucha Art (Jus de Nympheas)

Riana Lagarde in France sent me links to photos of artist Michel Blazy’s gorgeous kombucha art. “He calls it Jus de Nympheas and it is various kombucha scobys made to look like lily pads in the style of Monet’s garden.”

Photo below by Debra Solomon. More at http://www.flickr.com/photos/debrasolomonvanculiblog/sets/72157611391465072/with/3117414609/


New Frontiers of Miso

During my visit to New York, I had the opportunity to visit the testing laboratory kitchen of chef David Chang of Momofuku fame. My guide was kitchen lab director Dan Felder, a fellow fermentation geek. They have teamed up with Harvard microbiologists and have even been publishing scholarly papers on some of their experiments. They are doing a few things I’ve never tried, seen, or heard of. The most exciting was making miso from nuts and seeds rather than just legumes.

I sampled the flavors pictured above, and loved their rich flavors. Pistachio miso was my favorite. The nut misos were low-salt sweet misos, fermented for just a short time to avoid the oils going rancid. I don’t have recipes to provide, but I share this as inspiration for fellow experimentalists.

Another innovative project I sampled was koji, simply dried in a dehydrator and ground into a powder. They were using it with salt as a curing agent for lardo, and as a seasoning for fish. Koji has  a distinctive sweet flavor that could be used to season many different things.

Newsflash from the Walnut Ridge Restoration Project….

An amazing group of people has come together over the past few weeks to help me rescue and restore a beautiful 1840’s log cabin, Walnut Ridge, near my home in Tennessee. We’ve had a core group of a dozen people here for the whole month, and more than that cycling in for a day or a week or two. Altogether, at least 40 people have pitched in.

Repointing the chimney. Leopard, Fish, and Tom approach the roofline, as masonry mentor Willy advises.

Jen and Sarah beginning to deconstruct the roof around the chimney, so the pointers can access the top of the chimney. Roof will be replaced later in the summer.

We have built foundation walls, jacked up many parts of the house and replaced understructures, repointed the chimney, removed and replaced a rotted out sill, dug new drainage, removed walls and cladding, rechinked, and built a small kitchen addition. The project is ongoing; I think it’s still two years away from being ready to move my fermentation school into it. I am patient, because it is a beautiful building in a beautiful spot, and it feels so good to be addressing the underlying problems and giving it a new lease on life. And best of all, for the space to already be bringing people together, learning new skills and filling it with their hard work, good intentions, generous spirits, and love.

Sarah and Jen open up the roof.

The partially-removed roof with gorgeous shadows

Sarah and Josefina repointing above the roofline.

Josefina, Kayvon, and Kassidy ripping up a termite-damaged floor.

Gabriel checking measurements for a rafter cut, while wearing ear protection in the style of the Mouseketeers.

David and Joe “rechinking” between the logs using a mix of earth, sand, and straw.

Willy Rosencrans, who taught us all the art of stone masonry.

Alicia and Fish laying stones for the new foundation walls (where there had been none).

Oak setting cornerstones in what has affectionately become known as Oak’s corner.

Garments Made from Vinegar and Kombucha Mothers!

An Australian scientist, Gary Cass, and designer, Donna Franklin, recently created a garment from mother-of-vinegar grown on red wine (see links below), reminding me of a story from a couple of years ago of a English designer Suzanne Lee, who made a dress from mother of kombucha.

Kombucha fiber biker jacket designed by Suzanne Lee. Photo by BioCouture copyright 2011

See links below for more info and images. If you experiment in this vein and make any garments or sculptures from these cellulose mothers, please send images for me to post here!

http://bioalloy.org/o/

http://eco-chick.com/2012/06/11117/aussies-create-dress-made-from-microbes-found-in-wine/

http://shine.yahoo.com/fashion/dress-made-wine-181300537.html

http://www.biocouture.co.uk/

http://antenna.sciencemuseum.org.uk/trashfashion/home/wearwithoutwaste/material-desires/biocouture-jacket/


Yogurt cultured by Chili peppers

I received this email today from Boaz Shuval, a fermentation experimentalist in Israel, about a fascinating experiment he tried:

One of my favorite fermentations is yogurt making, and I’ve been making my own since 2005. For years I have been using commercial yogurt cultures as starters, and have had to replenish them every few generations. In your book you mentioned the heirloom yogurt cultures, which intrigued me. Unfortunately, the commercial sources of heirloom yogurt cultures do not ship to Israel, where I live. Nor do I know anyone who has an heirloom yogurt culture here in Israel. Therefore, it was with great interest that I read the chapter [in The Art of Fermentation] about plant origins of yogurt.
You mentioned a great deal of possible natural sources for yogurt cultures, some of which, like ant eggs, I was not keen on trying. However, you did mention that in India chili-pepper stems may be used as a source for yogurt cultures. This was something I was willing to try. So, I bought a package of red chili peppers from the store. I heated one liter of whole milk to 180F, and let it cool gradually to 110F (I let it cool slowly, over 2-3 hours). I briefly rinsed the chili peppers, and cut the stems off a dozen. I place the stems in a container, and added the milk. I placed that in my yogurt incubator. After 10 hours, nothing had happened. I decided to let it continue fermenting. After about 13 hours, the magic happened, and the milk had gelled! In fact, it had over-fermented a bit, and split. I had a layer of whey at the bottom, on top of which floated a very thick curd. I cooled it in the fridge, and it tasted like spicy, chili-flavored yogurt. I used one teaspoon of this yogurt to inoculate a fresh batch of milk.
Again, I repeated the same process: heat to 180F, cool to 110F, incubate at 110F-115F. The yogurt set beautifully after about three hours. This is a really fast-setting yogurt culture. The result was a very thick yogurt (this time I stopped the heat on time, so it did not split). I should probably say that it is a yogurt-like product as I don’t actually know what’s in it. Flavor-wise, it tasted very good. It is quite sweet and not very acidic, even thought its pH level does go down to 3.5-4 (I used a pH strip to test).
This yogurt culture so far has reliably made 5 generations of yogurt. My routine now begin at about 6:00 PM, where I heat up my yogurt. I then let it cool gradually over three hours. If, at 9:00 PM, it has cooled too much, I will heat it a little to raise the temperature to 110F. I add a teaspoon of yogurt culture from the previous batch (this I remove after the initial cooling of the yogurt and set aside). I incubate at 110F-115F for three hours, until midnight. By this time, the yogurt has begun to gel, although the gel is quite fragile. I kill the heat from my incubator at this point, and keep it insulated until the morning. By morning time, the yogurt will have beautifully set into a firm curd, and be just slightly warmer than room temperature. I then refrigerate it for several hours, where it continues to firm.
I am very excited about this. Naturally, I was very doubtful that this would even work. I have been sharing it with whomever would listen. I have also given some culture to a friend. I wanted to share this with you, so you could share it with more people than I can. It also makes me wonder what other sources of plants are used to make yogurt. Perhaps different plants can make different flavors and consistencies of yogurt? If you know of some information on the matter, I would greatly appreciate it if you could share it with me.
Thank you again for writing your fabulous new book. It is indeed a fantastic source, possibly the best source, of information about fermentation. It has been the source for many fermentation experiments at my home.
Best,
Boaz
All the (fragmentary) information I know related to this topic is in The Art of Fermentation, plus the experience described in this email. If others have experience with plants as a means of culturing milk, please post here as a response.

Semi-Raw Fermented Bread Pudding

This is a dish I recently tried that was completely unique and delicious.

It may not look glamorous, but it was a deeply satisfying ending to a potluck feast organized by my friends Mark Shipley and Michael Thompson in Chicago the other night.

The pudding was made by Chicago fermentation experimentalist Ben Walker. When I asked him what it was called, he suggested “Walker-kvass.” Kvass is a Slavic beverage made from dry old bread, and his starting point was just this: the dry ends of old breads, all whole grain sourdoughs.

He covered the bread with cream fermented with the Scandinavian milk culture fil mjolk, along with a little vanilla and maple syrup. Once the bread had softened, he weighed it down (with a cutting board, over a layer of parchment paper) , and let the bread sit fermenting in the cream and absorbing it, for about 18 hours, until all the liquid had absorbed into the bread. He made a sauce of melted butter, maple syrup, and whiskey, and brushed some of it on top of the bread. Thus assembled, Ben broiled the moist bread for a few minutes, just to crisp up and brown the surface, while leaving the bottom raw.

We ate the fermented bread pudding cooled, with more butter-maple-whiskey sauce, as well as home-preserved peaches. The finishing touch, oh so delicious, was a light sprinkling of chunky grains of pink salt and dry powdered galangal and ajwain (Trachyspermum ammi).

Oh this was a fermented dessert I will remember.


Aerobic vs Anaerobic Fermentation Controversy

I hear that much controversy is brewing on the internet over vessels for fermenting vegetables, and the implications of whether or not they are totally anaerobic. I have made hundreds of batches of kraut in all sorts of vessels (most of them open crocks), and I have witnessed, consistently, that it doesn’t matter. Each vessel has advantages and disadvantages. No particular type of vessel is critical. People have been fermenting vegetables for millennia in crocks open and closed, in pits and trenches, in sealed and open vessels. It can be done many different ways. The only critical factor is that the vegetables be submerged under brine.

Whenever vegetables are submerged under brine, lactic acid bacteria (which are anaerobic) develop. Whether or not the vessel protects the surface of the ferment from atmospheric oxygen, the microbial development under the brine is anaerobic lactic acid bacteria. In the vocabulary of microbiology, lactic acid bacteria are “facultative” in that they that do not require oxygen, but are not inhibited by its presence; in contrast, certain other bacteria (for example Clostridium botulinum) are “obligate” anaerobes that require a perfectly anaerobic environment.

The only difference air exposure or lack thereof makes is whether aerobic organisms like yeasts and molds can develop on the surface. The barrel of kraut I have had fermenting in the cellar for six months now is good and sour, and I have been eating from it and sharing it widely for months. Each time I remove the cloth tied down over it, and the jugs of water weighing it down, and the two semi-circular oak boards that rest upon the surface, I skim off a moldy layer around the edges and down the middle, wherever the surface was exposed to air. I toss the moldy layer into the compost, and the kraut beneath it looks, smells, and tastes wonderful. Many people have reported how good it made them feel and not a single person has complained of any problems from it, ever. The brine protects the vegetables from the aerobic organisms that grow on the exposed surfaces. The ferment is a lactic acid ferment, even though the surface is aerobic. Surface growth should be scraped away because if it is allowed to grow it can diminish the acidity of the kraut and affect flavor and texture, but if you keep periodically scraping mold away, the ferment beneath is fine.

I have also fermented in Harsch crocks, Pickl-Its, Mason Jars, and many other types of vessels. Mason jars become highly pressurized if you fail to loosen them to release pressure. Even if they are not perfectly airtight, they permit little airflow. Many times I have witnessed carbon dioxide force its way through the airtight seal by contorting the tops to provide an escape for the pressure. The various air-locked designs that allow pressure to release while preventing air from entering the system are generally effective at preventing aerobic surface growth. Yet still I generally do not use them because I love to look at and smell and taste my krauts as they develop, and each time you open an air-locked vessel you defeat its purpose, allowing air in. The vessels are effective, but are not well-suited to my desire to taste at frequent intervals. Different vessels suit different needs and desires. No one type of vessel is essential for fermenting vegetables. I have had success using every type of vessel I could think of. As long as you can keep vegetables submerged, lactic acid bacteria will develop. The process is extremely versatile.

For more in-depth information on fermenting vegetables, fermentation vessels, and all realms of fermentation, check out my new book, hot off the presses, The Art of Fermentation. Keep fermenting….

Making Sour Pickles

Excerpted from Wild Fermentation

Growing up in New York City, experiencing my Jewish heritage largely through food, I developed a taste for sour pickles. Most of what is sold in stores as pickles, and even what home canners pickle, are preserved in vinegar. My idea of a pickle is one fermented in a brine solution. Pickle-making requires close attention. My first attempt at brine pickle-making resulted in soft, unappealing pickles that fell apart, because I abandoned it for a few days, and perhaps because the brine was not salty enough, and because of the heat of the Tennessee summer. And and and. “Our perfection lies in our imperfection.” There are, inevitably, fermentation failures. We are dealing with fickle life forces, after all.

I persevered though, compelled by a craving deep inside of me for the yummy garlic-dill sour pickles of Guss’s pickle stall on the Lower East Side of Manhattan and Zabar’s on the Upper West Side and Bubbie’s in upscale health food stores elsewhere. As it turns out, brine pickles are easy. You just need to give them regular attention in the summer heat, when cucumbers are most abundant.

One quality prized in a good pickle is crunchiness. Fresh tannin-rich grape leaves placed in the crock are effective at keeping pickles crunchy. I recommend using them if you have access to grape vines. I’ve also seen references in various brine pickle recipes to using sour cherry leaves, oak leaves, and horseradish leaves to keep pickles crunchy.

The biggest variables in pickle-making are brine strength, temperature, and cucumber size. I prefer pickles from small and medium cucumbers; pickles from really big ones can be tough and sometimes hollow in the middle. I don’t worry about uniformity of size; I just eat the smaller ones first, figuring the larger ones will take longer to ferment.

The strength of brine varies widely in different traditions and recipe books. Brine strength is most often expressed as weight of salt as a percentage of weight of solution, though sometimes as weight of salt as a percentage of volume of solution. Since in most home kitchens we are generally dealing with volumes rather than weights, the following guideline can help readers gauge brine strength: Added to 1 quart of water, each tablespoon of sea salt (weighing about .6 ounce) adds 1.8% brine. So 2 tablespoons of salt in 1 quart of water yields a 3.6% brine, 3 tablespoons yields 5.4%, and so on. In the metric system, each 15 milliliters of salt (weighing 17 grams) added to 1 liter of water yields 1.8% brine.

Some old-time recipes call for brines with enough salt to float an egg. This translates to about a 10% salt solution. This is enough salt to preserve pickles for quite some time, but they are too salty to consume without a long desalinating soak in fresh water first. Low-salt pickles, around 3.5% brine, are “half-sours” in delicatessen lingo. This recipe is for sour, fairly salty pickles, using around 5.4% brine. Experiment with brine strength. A general rule of thumb to consider in salting your ferments: more salt to slow microorganism action in summer heat; less salt in winter when microbial action slows.

Timeframe: 1-4 weeks

Special Equipment:

  • Ceramic crock or food-grade plastic bucket
  • Plate that fits inside crock or bucket
  • 1-gallon/4-liter jug filled with water, or other weight
  • Cloth cover

Ingredients (for 1 gallon/4 liters):

  • 3 to 4 pounds/1.5 to 2 kilograms unwaxed
  • cucumbers (small to medium size)
  • 3⁄8 cup (6 tablespoons)/90 milliliters sea salt
  • 3 to 4 heads fresh flowering dill, or 3 to 4
  • tablespoons/45 to 60 milliliters of any form of
  • dill (fresh or dried leaf or seeds)
  • 2 to 3 heads garlic, peeled
  • 1 handful fresh grape, cherry, oak, and/or
  • horseradish leaves (if available)
  • 1 pinch black peppercorns

Process:

  1. Rinse cucumbers, taking care to not bruise them, and making sure their blossoms are removed. Scrape off any remains at the blossom end. If you’re using cucumbers that aren’t fresh off the vine that day, soak them for a couple of hours in very cold water to freshen them.
  2. Dissolve sea salt in ½gallon (2 liters) of water to create brine solution. Stir until salt is thoroughly dissolved.
  3. 3. Clean the crock, then place at the bottom of it dill, garlic, fresh grape leaves, and a pinch of black peppercorns.
  4. Place cucumbers in the crock.
  5. Pour brine over the cucumbers,place the (clean) plate over them, then weigh it down with a jug filled with water or a boiled rock. If the brine doesn’t cover the weighed-down plate, add more brine mixed at the same ratio of just under 1 tablespoon of salt to each cup of water.
  6. Cover the crock with a cloth to keep out dust and flies and store it in a cool place.
  7. Check the crock every day. Skim any mold from the surface, but don’t worry if you can’t get it all. If there’s mold, be sure to rinse the plate and weight. Taste the pickles after a few days.
  8. Enjoy the pickles as they continue to ferment. Continue to check the crock every day.
  9. Eventually, after one to four weeks (depending on the temperature), the pickles will be fully sour. Continue to enjoy them, moving them to the fridge to slow down fermentation.